

So now that you have bought the OnePlus 3 it is the time to awaken the flasher in you and flash a custom ROM, but for that you need to have root access to your phone. So today we will tell you how to Root OnePlus 3 without PC in 5 mins. We will be showing you a step by step guide on how you can unlock the bootloader and root the phone without voiding your warranty.
Make sure to backup your phone’s data before proceeding
This process will not void your phone’s warranty
Root OnePlus 3 without PC in 5 minutes [Updated]
Perquisites
Download these files on your PC/Mac.
ADB – http://bit.ly/28KADPS
TWRP – http://bit.ly/28K16cs
SuperSU – http://bit.ly/28JsPLI
Once you have downloaded the files mentioned above, follow this tutorial to root your OnePlus 3.
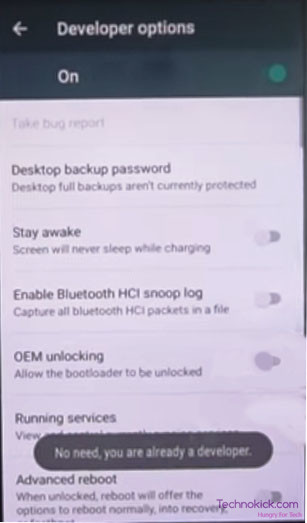
- Go to Settings and enable developer options by tapping build number 8 times. (Settings -> about -> build number)
- In settings now you will find Developer options, Enable it and then enable OEM unlocking, advanced reboot, and USB debugging.

Root OnePlus 3 without PC - Now long press the power button and select Reboot, now select “Reboot into bootloader mode”. After this, connect your phone to a PC.
- Copy the TWRP and Super SU files to your ADB folder.
- Now in the ADB folder, Press shift+right click and select open command window. Now type Fastboot devices in a window. It will show your OnePlus 3; it means that your phone is successfully connected.
- Now type fastboot OEM unlock, Once you type this, you will get an option on your phone asking to unlock the bootloader. Use the volume navigation keys and select the appropriate option and press the power button.
- Now remove your phone from PC, Your phone will be switched off. Press volume up and power button at the same time and fastboot should load. Now again connect it to the PC. Now type in the window on your computer, fastboot flash recovery.img.
- Now head back to your phone and press volume down button until you see recovery mode option and hit the power button so that the device will boot into the recovery mode which is TWRP recovery in this case.
- Now backup your ROM.
- Now once again connect the device to the PC(Switched on) and copy SuperSU file from your PC to phone’s storage. Now open your recovery, select install and select the SuperSu file from the list. Now swipe to flash it. Once done, reboot your device and now you successfully have your phone rooted.
Now to check if the phone is rooted or not, just download this app from play store called Root Checker. You now have access to your bootloader and you can install Xposed Modules etc, and you can also access the root directory files and tweak internal settings. This completes the procedure to root your OnePlus 3 Smartphone.


10 Responses
Point 3 says connect to a PC sort of defeats the point of the article
Hi, AT the time of publishing the article, THe phone was getting rooted by an app called “Bootloader-Bypass”. Now after the latest OTA, the app is no more working so we updated the procedure. We still tried to use the PC as less as possible 🙂
why don’t you change the title then??
first time doing it and hope i don’t fuck up my new phone
going to be extra careful
lets hope for the best
and i hope it was worth it
and a rooted device will be fun and better
but the hard part is finding good apps cuz i don’t know any
i can’t shift right click in the folder where do i do this
what do i do I’m stuck how do i go back help please I’m scared I’m on mac
Hi, Thanks for commenting. Please check back to our site within an hour. I will post another tutorial for Macs..
Regards
Nishant
i stopped the process luckily please make sure it works for the latest version of mac
cuz when i tried it didn’t work i couldn’t complete step 5 as i didn’t know where to shift and right click and i tried in the folder without clicking any other sub folders but nothing appeared and tried other things as well but nothing happened please fix and tell me what to do i would appreciate it also for the ppl who are planning to do this on mac it isn’t happening for me atleast and until technokick doesn’t sort it for MAC I WOULDNT ADVISE ANYONE WITH MACS TO DO THIS!!
Hi, Thanks for commenting. Please check back to our site within an hour. I will post another tutorial for Macs.
Regards
Nishant
Thanks for the guide. I found one issue:
fastboot flash recovery recovery.img
not
fastboot flash recovery.img
Change title you have to use the pc…